
Irresistible Thai Banana Roti: A Sweet Journey to Comfort Food Heaven
You know that feeling when a whiff of something delicious takes you back in time? For me, it’s the aromatic scent of Thai banana roti wafting through the air, instantly transporting me to bustling street markets in Thailand. As a child, my family would spend summer evenings indulging in warm, flaky roti stuffed with sweet bananas and drizzled with condensed milk. It was more than just food; it was a tapestry of love and laughter shared with family.
What makes this version of Thai banana roti so special? For starters, the golden, buttery layers of the roti create the perfect contrast against the soft, gooey bananas inside. And trust me, this homemade recipe beats any store-bought or restaurant version by a long shot! Using simple ingredients and just a bit of patience, you can recreate that authentic taste right in your kitchen.
Are you ready to embark on this culinary adventure? In this post, you’ll learn how to whip up your very own Thai banana roti – from the dough that fluffs up to perfection, down to the delicious toppings that make it irresistible. Grab your apron, and let’s dive in!
What Are Thai Banana Roti?
Thai banana roti, or roti gluay, is a traditional Thai street food that has gained popularity worldwide for its mouthwatering flavor and delightful texture. Originating from Indian cooking, the roti is made from unleavened dough that becomes flaky and tender when cooked on a hot griddle. The addition of ripe bananas nestled within the dough adds a naturally sweet and fruity twist that makes these treats even more special.
When you take your first bite, you’ll experience a lovely crunch from the outer layer followed by the warm, sweet banana melting in your mouth. These may sound like an indulgent dessert, but they can easily be enjoyed as a snack, breakfast, or even a fun party treat. The delightfully customizable nature of this dish means you can experiment with different fillings and flavors according to your whims. So, whether it’s a laid-back brunch with family or a vibrant celebration with friends, Thai banana roti is bound to be a hit!
Why You’ll Love This Recipe
-
Authentic Taste: There’s nothing quite like the satisfaction of creating your own Thai banana roti at home. The flaky texture and banana filling will have you reminiscing about your favorite street food stalls.
-
Cost-Effective: Why splurge on expensive takeout when you can whip up a batch of these delightful treats for a fraction of the cost? With simple, pantry-friendly ingredients, you can make plenty to share (or not—no judgment here!).
-
Customization Galore: One of the best things about this recipe is how easily you can adjust it to fit your taste. Feel free to experiment with different fruits, drizzles, and even savory fillings!
-
Easy to Master: Even if you’re a novice in the kitchen, don’t worry! The steps are straightforward and offer plenty of opportunity to learn and perfect your skills.
-
Perfect for Meal Prep: Make a big batch ahead of time, and you’ll have this delicious treat on hand whenever you crave a little sweetness. They freeze beautifully and can be reheated whenever you need a comfort food fix!

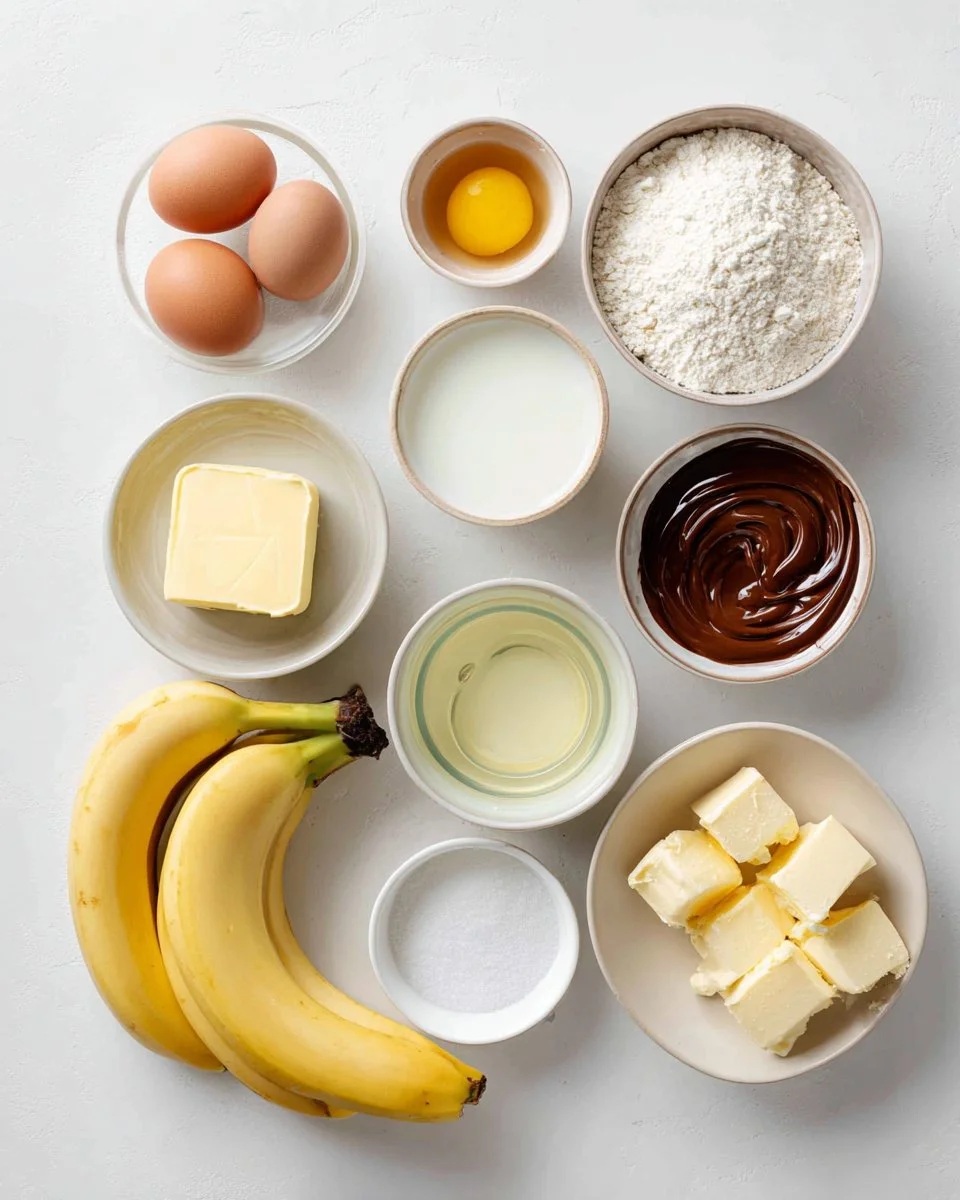
Ingredients
Here’s what you’ll need to make the most delicious Thai banana roti:
- 1 ½ tsp salt: Enhances flavor; use fine sea salt for best results.
- 1 Tbsp sweetened condensed milk (or 1 tablespoon sugar): Adds sweetness to the dough; condensed milk lends a richer flavor.
- 1 large egg: Binds ingredients together; ensure it’s at room temperature for smoother mixing.
- 260 ml water: Use lukewarm water to help activate the dough.
- 500 g all-purpose flour: Provides structure; measuring by weight will yield the best results.
- 55 g unsalted butter, room temperature: Gives the roti that irresistible buttery flavor. Aim for a high-quality creamery butter.
- 1 ½ Tbsp unsalted butter (for coating the dough): Melted, to enrich the final product.
- 1 Tbsp neutral-flavored oil (for coating the dough): Keeps the dough from sticking and ensures it stays moist.
- Neutral-flavored oil for cooking: I recommend canola or grapeseed oil.
- Extra unsalted butter for cooking (optional): For those extra indulgent rounds!
- Bananas: Ripe, but not overly so. This balance guarantees they melt nicely during cooking without turning to mush.
- Sweetened condensed milk for drizzling: For that authentic flavor, or swap in melted Nutella or chocolate sauce for a twist!
- Granulated sugar for sprinkling: Just a touch for sweetness; use organic sugar if you prefer.
Notes on Ingredient Quality/Substitutions
- Butter: Use a high-quality unsalted butter for best results.
- Bananas: I recommend using Cavendish bananas, as they sweeten nicely when cooked.
- Everything should be prepped and ready to go: Ensure your butter is at room temperature, and your ingredients are set out before you start.
Step-By-Step Instructions
-
Mix Water & Seasoning: In a large mixing bowl, combine the salt and lukewarm water, whisking until the salt dissolves. Add the condensed milk and egg; whisk until everything is well combined.
-
Prepare the Dry Ingredients: In another bowl, mix the flour and 55 g of butter. Rub the butter into the flour with your fingers until no large chunks remain.
-
Combine & Knead: Gradually stir the flour mixture into the water mixture, kneading it gently until all dry flour is absorbed and a shaggy dough forms. Cover it with a cloth and let it rest for 15-30 minutes—this makes a big difference in texture!
-
Knead Again: Knead on a clean, lightly floured surface for about 5 minutes. If the dough is sticking, sprinkle in a little more flour. Allow it to rest again for another 10-15 minutes.
-
Shape the Dough: Mix melted butter and oil in a small bowl for coating. Cut the dough into 80g pieces, forming each into a ball. Coat each ball with the butter mixture and rest them, covered, for at least 3 hours or refrigerate overnight.
-
Roll the Roti: Roll each dough ball into a thin sheet on a lightly floured surface.
-
Heat the Skillet: In a flat skillet, heat oil over medium heat. You can test the oil with a small piece of dough; if it bubbles, it’s ready!
-
Add the Bananas: Place the rolled dough in the pan, add thin banana slices to the center, and fold the edges over to encase the filling. Cook until browned and crispy, about 2-3 minutes on each side, flipping carefully.
-
Add Optional Butter: For a richer flavor, add a small pat of butter beside the roti in the pan while cooking.
-
Serve with Toppings: Cut the cooked roti into pieces and generously drizzle with sweetened condensed milk or Nutella, and sprinkle with sugar. Enjoy!
Chef’s Tips
- Visual Cues: As the roti cooks, look for a golden-brown color and a crispy texture.
- Avoid Common Mistakes: Be mindful not to over-knead the dough; you want it soft and pliable, not tough.
Expert Tips & Tricks
Creating the perfect Thai banana roti is easier than it sounds. Here are my top tips for an extraordinary experience:
- Let it Rest: Don’t skip the resting step! This allows the gluten to relax, resulting in a lighter texture.
- Experiment with Fruits: While bananas are traditional, try using shredded coconut, chocolate chips, or even cooked apples for a delightful twist!
- Storage Recommendations: These roti store well in an airtight container at room temperature for up to 2 days. For longer, freeze them between layers of parchment paper.
- Make-Ahead Instructions: You can prepare the dough and freeze it. Just remember to thaw it overnight in the refrigerator before rolling it out.
- Troubleshooting: If you find your dough is too dry, add a teaspoon of water. If it’s too sticky, sprinkle in more flour until it reaches the right consistency.
Serving Suggestions
Thai banana roti is delicious on its own, but why not jazz it up? Consider pairing it with a scoop of coconut ice cream for an indulgent treat, or serve it with a side of fresh fruit. Present your roti on a colorful platter, drizzled with sweetened condensed milk or chocolate sauce, and garnished with mint leaves for a burst of freshness. Ideal for casual get-togethers, brunch with friends, or even as a sweet closure to a spicy dinner!
Variations & Substitutions
The beauty of Thai banana roti lies in its versatility. Here are some ideas to innovate your creations:
- Flavor Combinations: Swap out bananas for mango, apples, or peaches—these all work beautifully when warmed.
- Dietary Adjustments: For a vegan option, substitute the egg with flaxseed meal and use plant-based milk and shortening.
- Seasonal Variations: Try adding pumpkin puree in the fall or a sprinkle of cinnamon for a warm, cozy vibe.
Nutrition & Storage Info
- Prep Time: 25 minutes (plus resting time)
- Cook Time: 10-15 minutes
- Total Time: 1 hour (plus resting time)
- Yield: Makes about 8 servings
- Estimated Calories: Approximately 200 calories per serving (varying with toppings)
- Storage Instructions: Keep at room temperature for up to 2 days; refrigerate for up to one week; freezes well for up to two months.
FAQ Section
-
Can I use whole wheat flour instead of all-purpose flour?
Yes! Whole wheat flour will add a nutty flavor, but the texture might be a bit heavier. -
What if my dough is sticky?
Keep a bit of flour handy and sprinkle as necessary while kneading. -
Can I make Thai banana roti in advance?
Absolutely! You can refrigerate or freeze the dough, and then roll and cook when you’re ready. -
Can I skip the resting times?
While you can technically skip these, resting helps improve texture and flexibility in the dough. -
How should I store leftovers?
Store them in an airtight container at room temperature, or refrigerate for longer shelf life. -
What type of oil is best for cooking?
Neutral oils like canola or grapeseed are ideal to maintain the flavor profile. -
Can I use a different sweetener instead of condensed milk?
Certainly! Honey or maple syrup are great alternatives, but keep in mind they may alter the final flavor. -
Are these pancakes gluten-free?
For a gluten-free version, substitute all-purpose flour with a gluten-free blend. -
What if I don’t have a skillet?
A non-stick pan also works perfectly! Just make sure it’s heated evenly before cooking. -
How do I know when to flip the roti?
Look for golden brown edges; it’s a sure indication that it’s time to flip!
Conclusion
This Thai banana roti recipe is not just a snack; it’s a cherished memory waiting to be recreated in your kitchen. Whether you’re sharing it with family over an afternoon tea or indulging yourself on a cozy evening, you’ll appreciate the love that goes into every bite. I encourage you to try this recipe and possibly modify it to suit your taste. Feel free to leave your thoughts or feedback in the comments below—I’d love to hear your stories!
And if you enjoyed this, don’t forget to check out my other related recipes on the blog—delicious adventures await!

Thai Banana Roti
Ingredients
Method
- In a large mixing bowl, combine the salt and lukewarm water, whisking until the salt dissolves. Add the condensed milk and egg; whisk until everything is well combined.
- In another bowl, mix the flour and 55 g of butter. Rub the butter into the flour with your fingers until no large chunks remain.
- Gradually stir the flour mixture into the water mixture, kneading it gently until all dry flour is absorbed and a shaggy dough forms. Cover it with a cloth and let it rest for 15-30 minutes.
- Knead on a clean, lightly floured surface for about 5 minutes. If the dough is sticking, sprinkle in a little more flour. Allow it to rest again for another 10-15 minutes.
- Mix melted butter and oil in a small bowl for coating. Cut the dough into 80g pieces, forming each into a ball. Coat each ball with the butter mixture and rest them, covered, for at least 3 hours or refrigerate overnight.
- Roll each dough ball into a thin sheet on a lightly floured surface.
- In a flat skillet, heat oil over medium heat. Test the oil with a small piece of dough; if it bubbles, it’s ready!
- Place the rolled dough in the pan, add thin banana slices to the center, and fold the edges over to encase the filling. Cook until browned and crispy, about 2-3 minutes on each side, flipping carefully.
- For a richer flavor, add a small pat of butter beside the roti in the pan while cooking.
- Cut the cooked roti into pieces and generously drizzle with sweetened condensed milk or Nutella, and sprinkle with sugar. Enjoy!