
Unlocking the Flavor: How to Make Irresistible Thai Chili Flakes (Prik Bon)
Ever since I can remember, my family’s kitchen was the heart of our home, filled with the smells of spices and sizzling dishes that told stories of our heritage. Among the spices that held a special place on my family’s shelf were Thai chili flakes, also known as Prik Bon. Each time I put a sprinkle over a steaming plate of pad Thai or a warm bowl of soup, I was reminded of family cooking sessions, laughter, and shared meals.
What sets these Thai chili flakes apart is not just their bright red color or the heat that kicks you pleasantly in the palate. It’s the perfectly balanced flavor that dances between smoky and spicy, making every dish sing. Unlike store-bought versions laden with preservatives, this homemade recipe allows you to control the ingredients fully, making it healthier and more vibrant.
In this post, I’ll share my secrets on how to make Thai chili flakes (Prik Bon) at home. You’ll discover not just a recipe, but a journey that brings you closer to the beautiful flavor profile of Thai cuisine. So grab your apron, and let’s dive into this delectable adventure together!
What are How to Make Thai Chili Flakes (Prik Bon)?
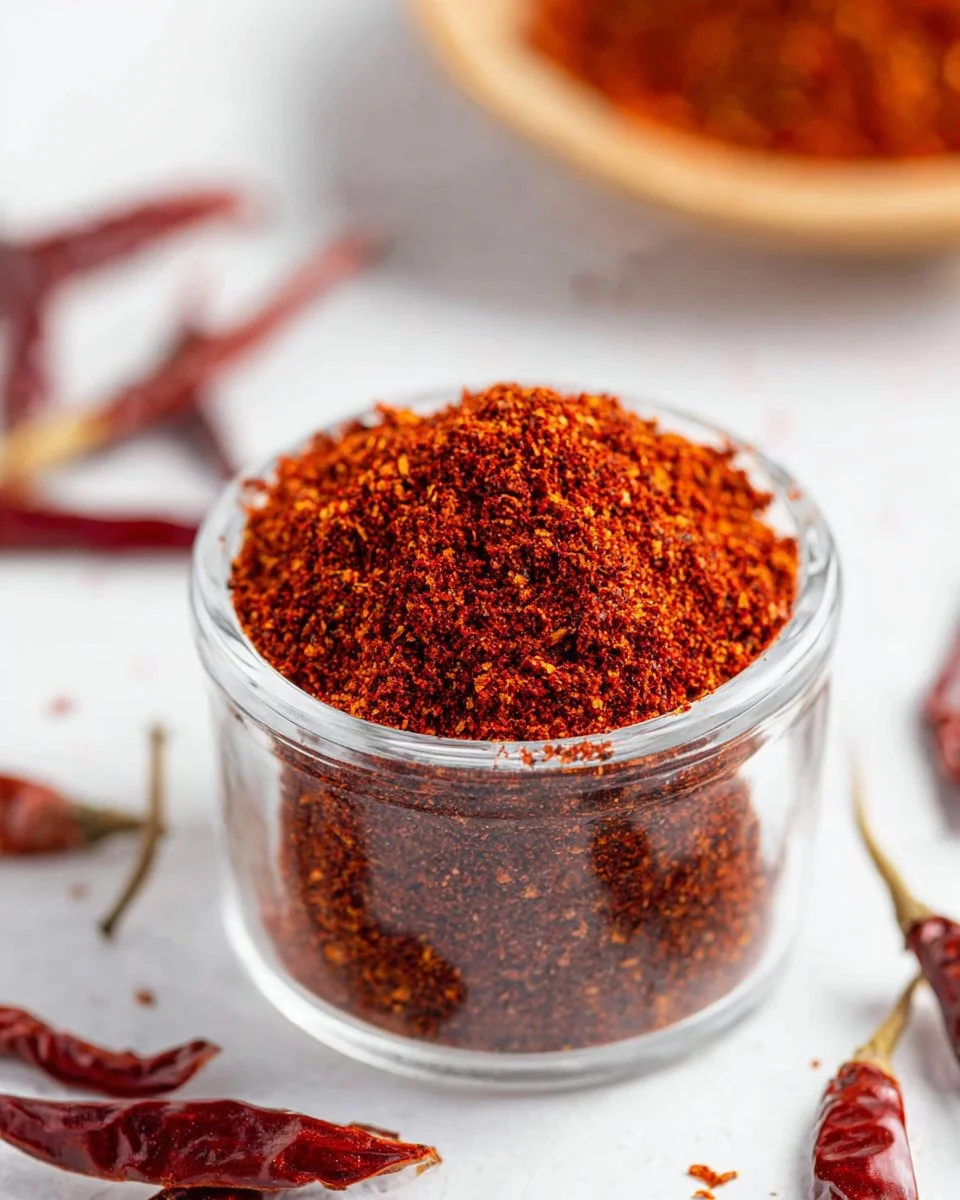
Thai chili flakes, or Prik Bon, hail from the vibrant land of Thailand where they are celebrated for their ability to transform any dish into an explosion of flavor. Made from dried Thai chilies, they offer a perfect balance of heat and flavor, giving food a rich and smoky essence. With a slightly crispy texture, these flakes aren’t just fiery; they add depth to your culinary creations.
What makes Prik Bon unique is their specific sun-drying process and the choice of chilies, which can vary in heat from mild to hot. They are versatile in their uses — from sprinkling over noodle dishes and stir-fries to enhancing soups and marinades. Essentially, they’re a must-have in your spice cupboard, ready to elevate any dish in seconds.
So when should you make them? Whenever you want to bring a touch of authenticity to your cooking or replace those store-bought versions that can’t capture the true essence of Thai flavors.
Why You’ll Love This Recipe
-
Homemade Goodness: Let’s be honest — there’s nothing quite like the satisfaction of creating something from scratch. This easy recipe transforms a humble dried chili into an aromatic sprinkle of joy that can be customized according to your heat tolerance.
-
Quality Control: Unlike store-bought versions stuffed with additives, making your own Thai chili flakes ensures pure ingredients. You can pick high-quality dried Thai chilies without any sketchy preservatives.
-
Budget-Friendly: You may find that a good jar of Prik Bon can be surprisingly expensive. Making it at home saves you money, and being able to whip up a fresh batch whenever necessary is a win!
-
Customizable Heat: Perhaps you prefer things on the milder side? No problem! You control the balance. I love mixing in some fragrant herbs or even a pinch of sugar to amplify the flavor without cranking up the heat level too much.
-
Simple Steps, Mighty Flavors: This recipe doesn’t require any complicated kitchen gadgets or skills. You’ll be amazed by how simple the process is, and in less than an hour, you’ll have a batch of chili flakes that’ll make your taste buds dance!
Ingredients Section

-
3 loose cups of dried Thai chilies: Choose quality over quantity. I recommend looking for chilies that are bright-colored and free of blemishes. You might find varieties labeled “bird’s eye” or “Thai chili” at your local Asian market.
*Tip: If you're sensitive to spice, consider mixing in some milder varieties of dried chilies.* -
1 tablespoon of salt: I typically use kosher salt as it’s less salty and adds a bit of crunch to the flakes.
-
1 teaspoon of sugar (optional): This helps balance the heat, especially if you’re using extra spicy chilies.
-
2 tablespoons of your favorite oil (optional): A nice neutral oil like grapeseed or canola can enhance the texture if you choose to sauté your chilies before grinding.
Preparation Notes: Make sure your butter or oil is at room temperature if using for any sauteing. This makes it easier to incorporate into the chilies.
Step-by-Step Instructions
-
Toast the Chilies: Heat a pan over low heat with no oil. Add your dried chilies, stirring continuously for about 5-7 minutes. You should notice a more vibrant color — the chilies will be shiny and darker, but be careful not to blacken them.
Chef’s Tip: Keep a close eye on the chilies! They can go from perfectly toasted to burnt in a heartbeat!
-
Cool It Down: Once they’re done toasting, remove them from the heat and transfer them to a bowl to cool completely. This is crucial to enhance the flavors without retaining any unpleasant bitterness.
-
Grind It Up: After the chilies are cool, transfer them to a blender or food processor. Grind until you reach your desired texture, whether you prefer coarser flakes or a finer powder.
Common Mistake Alert: Avoid over-grinding if you want a flakier texture!
-
Storing: Store your lovely homemade Thai chili flakes in an airtight container. They’ll stay fresh for about 1-2 months, but for optimal flavor, consume them sooner.
Note: While they last longer, over time they lose their heat and flavor, so enjoy them while you can!
Expert Tips & Tricks
-
Choosing Chilies: Experiment with different heat levels. For those with moderate spice tolerance, a mix of dried Thai chilies with sweeter varieties will provide a nice balance.
-
Storage: An opaque container stored in a cool, dark place (like a pantry) will lend longevity to your chili flakes. Avoid glass containers that can let light in.
-
Make-Ahead: You can prepare a large batch and gift them in beautiful jars to friends or family. Imagine their delight when they experience those homemade flavors!
-
Troubleshooting: If your flakes turn out too bitter, you might have toasted them too long—try a lighter toast in your next attempt!
Serving Suggestions
These Thai chili flakes can enhance an array of dishes. They pair beautifully with:
- Noodles and stir-fries: A sprinkle right before serving elevates the flavors and brings warmth to the dish.
- Soups: They’re perfect on top of the soup, providing both warmth and texture.
- Salads: Give your salads a kick with a surprising dash of heat.
For presentation, consider placing them in a beautiful dish next to your main course as a spicy condiment. This addition can be great for family gatherings where everyone can customize their plates!
Variations & Substitutions
-
Smoked Flavors: Try adding a pinch of smoked paprika to your chili flakes for an extra smoky depth.
-
Herb Infusion: Mixing in crushed herbs like basil or cilantro can create aromatic and flavorful combinations, perfect for various Asian-inspired dishes.
-
Seasonal Spices: Experiment with adding seasonal spices, like cinnamon or nutmeg during the winter, to create unique flavors that suit your palate.
Nutrition & Storage Info
- Prep Time: 15 minutes
- Cook Time: 15 minutes
- Total Time: 30 minutes
- Yield: Approximately 1 cup of chili flakes
- Estimated Calories: 6 calories per teaspoon
- Storage Instructions: Consume within 1-2 months for best flavor, store in an airtight container at room temperature.
FAQ Section
-
Can I use fresh chilies instead of dried?
Fresh chilies contain a lot of moisture, making them unsuitable for this recipe. Stick with dried chilies for the best results. -
How spicy are these Thai chili flakes compared to store-bought?
Homemade versions often have more pronounced flavor and heat. The spiciness can be adjusted based on the types of chilies you use. -
How do I know when the chilies are done toasting?
You’ll detect a fragrant aroma, and the chilies will have darkened slightly in color without being burnt. -
Can I store chili flakes in the fridge?
While you can, it’s not necessary if stored properly. Air-tight, opaque containers in a cool place work best. -
What dishes do Thai chili flakes enhance the most?
They are fantastic in noodle dishes, soups, marinades, and sauces. Use them anywhere you want to add heat! -
Can you make Thai chili flakes without toasting?
Toasting enhances flavor, but if you’re short on time, you can skip it — expect a slightly less vibrant flavor. -
What if I want a milder version?
Incorporate milder chilies or decrease the amount of dried chilies you use during the grinding process. -
Can I mix in other spices?
Absolutely! Experimenting with cumin, coriander, or both can yield delightful results. -
How long do chili flakes last?
While the flavor and heat start to diminish after a couple of months, they can last longer if stored correctly — just won’t be as potent. -
Can I use this recipe for different types of chilies?
Yes, feel free to experiment with other dried chilies, but note that each variety has its own unique flavor and heat profile.
Conclusion
There you have it — the magical journey of crafting your own Thai chili flakes (Prik Bon) at home! These vibrant, bold, and delicious flakes add a whole new dimension to your meals, and I just know that first sprinkle will bring a rush of warmth and nostalgia.
I encourage you to try this recipe and let me know about your tantalizing concoctions! Share your thoughts and ideas in the comments — I’d love to hear from you. Don’t forget to explore other vibrant recipes on my blog that embrace the world of spices and flavors!

Thai Chili Flakes (Prik Bon)
Ingredients
Method
- Heat a pan over low heat without oil. Add dried chilies and stir continuously for about 5-7 minutes until vibrant and shiny, but avoid blackening.
- Remove the chilies from heat and transfer them to a bowl to cool completely.
- Once cool, transfer the chilies to a blender or food processor and grind to your desired texture.
- Store in an airtight container at room temperature. Consume within 1-2 months for optimal flavor.