Irresistible No Bake Oreo Cheesecake: Your Ultimate Guide to a Decadent Dessert!
There’s something incredibly nostalgic about certain desserts that transport you back to your childhood. For me, that dessert is a No Bake Oreo Cheesecake. Maybe it’s the creamy, dreamy texture that melts in your mouth, or perhaps it’s the crunchy chocolate cookie crust that contrasts perfectly with the rich filling. No matter the reason, this cheesecake has held a special place in my family gatherings for years. I still remember the first time I made it with my mom; we laughed, made a mess in the kitchen, and shared stories over the sweet, creamy concoction we whipped up together.
What makes this No Bake Oreo Cheesecake truly special? It’s not only the simplicity of throwing it together without the need to bake but also the rich flavor it delivers in every bite. Trust me, it’s better than any store-bought version you’ll find, and once you whip it up, your family will be asking for seconds (and thirds)!
In this blog post, I promise you’ll learn how to create this decadent dessert from scratch, explore variations, and pick up pro tips along the way. So grab your apron and let’s dive into the world of No Bake Oreo Cheesecake!
What Are No Bake Oreo Cheesecakes?
The origins of cheesecakes can be traced back to ancient Greece, but the No Bake Oreo Cheesecake is a modern marvel that captures its spirit while offering a rich and cookie-inspired twist. At its core, this dessert combines the classic flavors of cream cheese and sugar with the beloved Oreos we all know and love. Imagine sinking your spoon into a velvety filling resting atop a crunchy chocolate cookie crust!
The taste is nothing short of indulgent; you get the sweetness of the cream cheese paired with the slight bitterness of the cocoa from the Oreos, creating a harmonious balance. The texture is creamy, light, yet dense enough to keep you excited for the next bite.
You should definitely whip one up for any occasion—whether it’s a birthday celebration, a holiday gathering, or just a well-deserved treat for yourself after a long week.
Why You’ll Love This Recipe
-
Easy and Quick: This No Bake Oreo Cheesecake may look stunning, but it’s incredibly simple to make! With just a handful of ingredients, you’ll have your dessert ready in no time, without the fuss of baking.
-
Cost-Effective: Unlike those pricey bakery cheesecakes, this recipe is wallet-friendly. You can create a dazzling dessert without breaking the bank, making it perfect for casual get-togethers or last-minute events.
-
Customization Galore: Want to add a little flair? You can mix in different add-ins or toppings—think peanut butter, mint, or even seasonal fruits!
-
No Special Equipment Required: No need for fancy kitchen gadgets. All you need is a food processor and a mixing bowl, making this an accessible recipe for everyone, even those who are less experienced in the kitchen.
-
Make-Ahead Delight: This cheesecake is perfect for preparing ahead of time. Just refrigerate overnight, and you’re all set for your gathering. It’s one less thing to worry about!
Ingredients
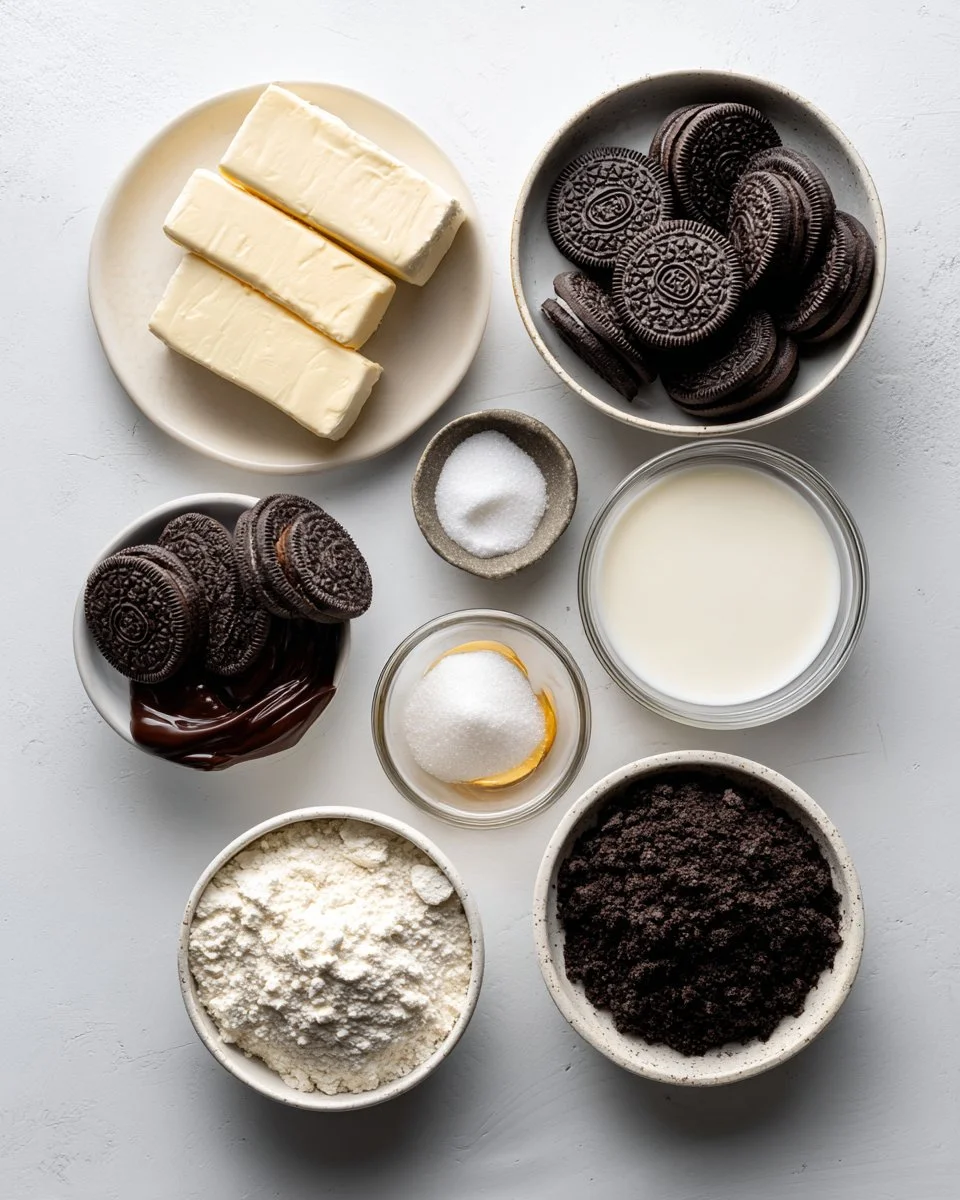
- 24 Oreo cookies, filling removed and reserved
- 6 tablespoons (85 g) butter, melted
- 16 ounces (454 g) cream cheese, softened to room temperature
- 1/2 cup (100 g) granulated sugar
- 1 teaspoon vanilla extract
- 2 1/2 cups (595 g) heavy whipping cream
- 1 1/2 cups (188 g) confectioners’ sugar
- 15 Oreo cookies, crushed and divided for garnish
- Hot fudge, for drizzling on top
Ingredient Notes:
- Oreo Cookies: Use standard Oreos for the base, or try different flavors to switch things up!
- Butter: Make sure it’s unsalted and melted for easy mixing.
- Cream Cheese: Use high-quality cream cheese for the creamiest texture—brands like Philadelphia work great.
- Heavy Whipping Cream: To achieve those stiff peaks, always choose a heavy (whipping) cream with at least 36% fat content. It makes all the difference.
Prep Notes:
- Allow your cream cheese and butter to come to room temperature to mix seamlessly.
Step-by-Step Instructions
-
Prepare the Crust: Start by taking 24 Oreo cookies, filling removed, and adding them to a food processor. Pulse until finely crushed. In a bowl, combine the processed cookies with 6 tablespoons of melted butter and mix until blended. Press the mixture firmly into the bottom of a 9-inch springform pan. Pop it in the fridge to chill while you make the filling. Chef’s Tip: Use the backside of a measuring cup to pack your crust tightly.
-
Make the Cheesecake Filling: In a large mixing bowl, beat 16 ounces of cream cheese until it’s light and fluffy—around 2-3 minutes. Then, add 1/2 cup of granulated sugar, 1 teaspoon of vanilla, and the reserved Oreo filling. Mix until well combined.
-
Whip the Cream: In a separate bowl, pour in 2 1/2 cups of heavy whipping cream and whip until it thickens. Gradually add 1 1/2 cups of confectioners’ sugar and whip until you achieve stiff peaks. Visual Cue: The cream should hold its shape when you lift the whisk out of the bowl.
-
Combine: Gently fold the whipped cream into the cream cheese mixture, then add in 1 cup of crushed Oreos. Be careful not to deflate the mixture—this keeps it light and airy. Common Mistake to Avoid: Avoid over-mixing once you add the whipped cream, as it can make the cheesecake dense.
-
Assembly & Chill: Pour the creamy filling over your chilled Oreo crust and spread it evenly. Cover with plastic wrap and refrigerate for at least 3-4 hours (preferably overnight) to allow it to set.
-
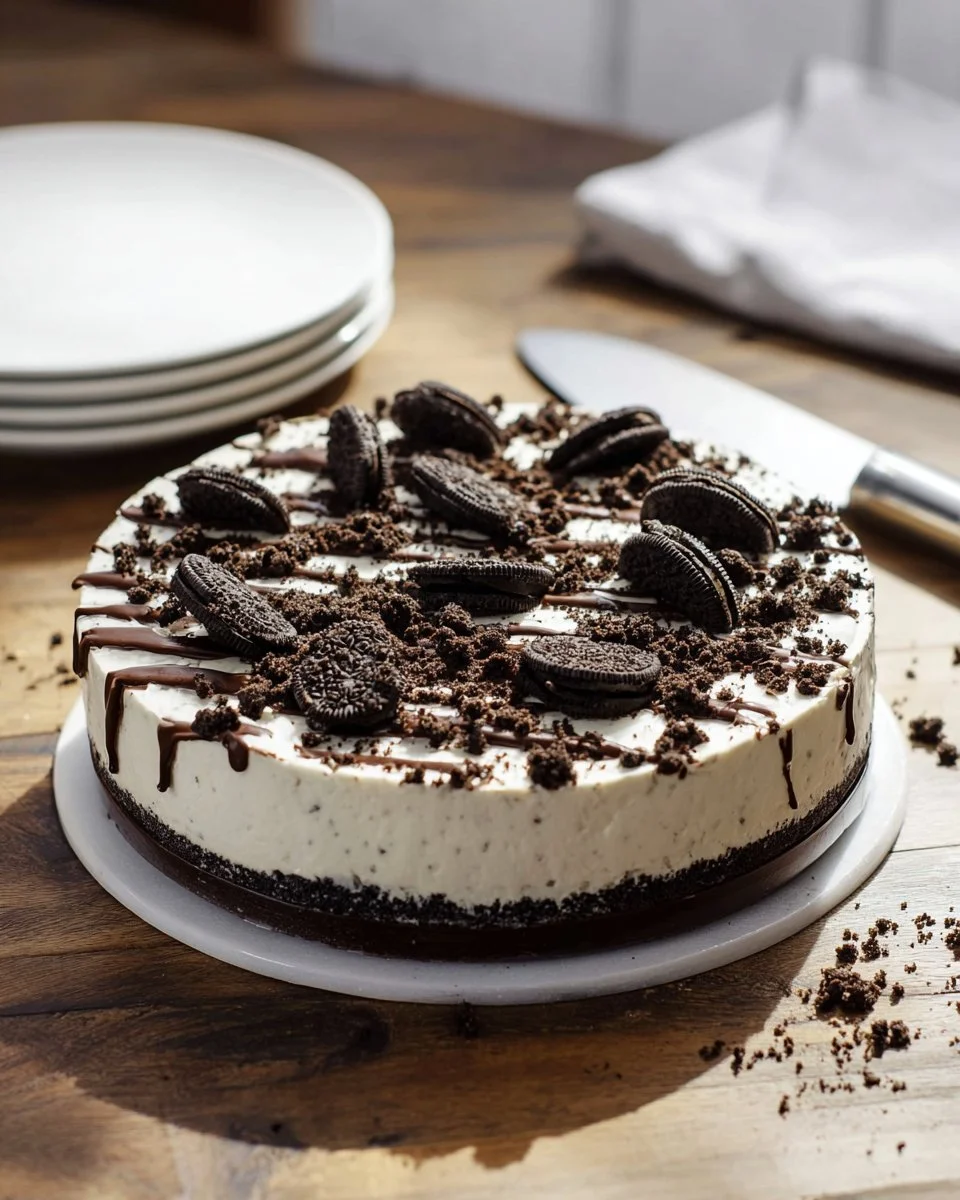
Garnish and Serve: Just before serving, top with remaining whipped cream, sprinkle on remaining crushed Oreos, and drizzle with hot fudge. Enjoy this delicious creation!

Expert Tips & Tricks
-
Storage: Leftovers (if there are any!) can be stored in an airtight container in the refrigerator for up to 5 days. If you want to freeze it, cut into slices, wrap them tightly in plastic wrap, and they’ll last up to 3 months in the freezer.
-
Make-ahead: This No Bake Oreo Cheesecake can be made up to 2 days in advance! Just remember to keep it tightly covered while chilling.
-
Common Problems: If your cheesecake isn’t setting correctly, it may need more time in the fridge. Patience is key for a perfect No Bake Oreo Cheesecake!
Serving Suggestions
This No Bake Oreo Cheesecake is rich and luxurious all on its own, but pair it with a scoop of vanilla ice cream or fresh berries for a contrast that elevates every bite. Serve on special occasions like birthdays or holidays, and watch it become a favorite among friends and family!
Variations & Substitutions
Want to switch it up? Here are a few ideas:
-
Peppermint Oreo Cheesecake: Swap regular Oreos for peppermint-flavored ones and add crushed candy canes for a seasonal twist.
-
Nut Butter Bliss: Fold in some natural peanut butter or almond butter for a delightful chocolaty-nutty version.
-
Seasonal Flavors: Add pumpkin puree and pumpkin spice for a festive fall treat!
-
Dietary Changes: Use gluten-free Oreos and a dairy-free cream cheese substitute, and you have a delicious alternative for those with dietary restrictions!
Nutrition & Storage Info
- Prep Time: 20 minutes
- Chill Time: 3-4 hours
- Total Time: 3 hours 20 minutes (not including overnight fridge time)
- Yield: 10 servings
- Estimated Calories: Approximately 400 calories per serving
- Storage Instructions: Store in the fridge for up to 5 days, or freeze for up to 3 months.
FAQ Section
-
Can I use low-fat cream cheese?
- Yes, but it may result in a slightly different texture. Full-fat cream cheese gives a richer flavor and creamier texture.
-
Do I need a springform pan?
- While a springform pan is ideal for cheesecakes, you can use a regular pie pan. Just be careful when serving!
-
How can I make it gluten-free?
- Use gluten-free Oreos and ensure all other ingredients are gluten-free.
-
Can I replace heavy cream with something lighter?
- You can use whipped topping or a lighter cream, but keep in mind that it may not hold up as well.
-
Why is my cheesecake not setting?
- It may require more time in the fridge. Make sure to give it a full 4 hours or overnight for the best results.
-
Can I add flavors to the cheesecake?
- Absolutely! Flavor extracts like almond or lemon work wonderfully in the filling.
-
How should I serve this cheesecake?
- Chill and serve straight from the fridge. A drizzle of chocolate or caramel sauce adds an extra sweetness!
-
What’s the best way to cut cheesecake?
- Dip your knife in warm water, wipe it clean, and cut. This method gives you neat slices.
-
How long can I keep leftovers?
- Leftovers can be stored in the fridge for up to 5 days or frozen for up to 3 months.
-
Can I make this cheesecake vegan?
- You can swap traditional ingredients for vegan alternatives like nut-based cream cheese and coconut cream.
Conclusion
This No Bake Oreo Cheesecake is not just a dessert; it’s an experience filled with joy, laughter, and delicious memories. It’s perfect for sharing with loved ones or indulging in solo after a long day. I encourage you to give this recipe a try—you won’t regret it! Please drop a comment below with your results or any of your personal twists, and don’t forget to check out other mouthwatering treats on my blog, like the no-bake strawberry cheesecake and classic chocolate mousse. Happy baking!

No Bake Oreo Cheesecake
Ingredients
Method
- Start by crushing 24 Oreo cookies in a food processor until finely crushed. Mix with melted butter until blended.
- Press the mixture into the bottom of a 9-inch springform pan and chill in the fridge.
- In a large bowl, beat cream cheese until light and fluffy, then mix in sugar, vanilla, and reserved Oreo filling.
- In a separate bowl, whip heavy cream until thick and gradually add confectioners' sugar until stiff peaks form.
- Fold the whipped cream into the cream cheese mixture and gently stir in 1 cup of crushed Oreos.
- Pour the filling over the chilled crust, cover with plastic wrap, and refrigerate for at least 3-4 hours, preferably overnight.
- Just before serving, top with whipped cream, sprinkle remaining crushed Oreos, and drizzle with hot fudge.