
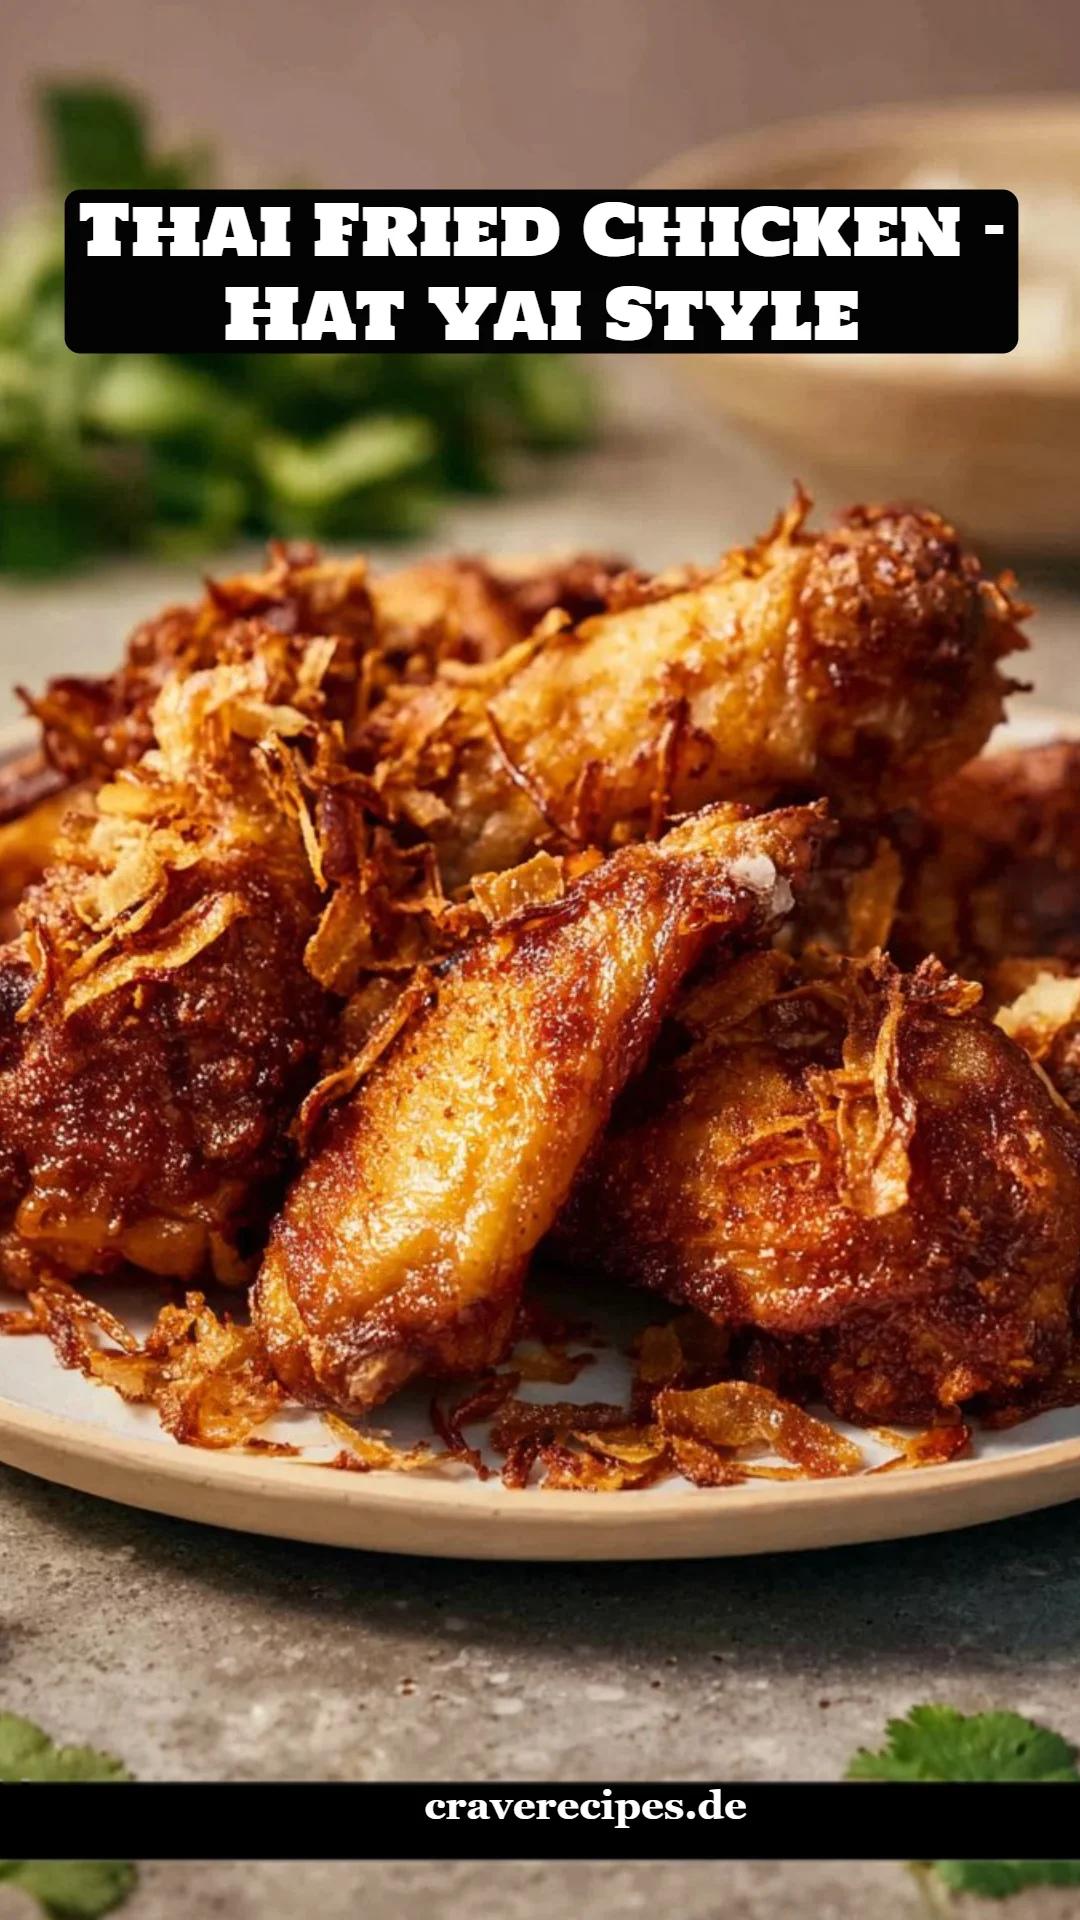
Crispy & Flavor-Packed Thai Fried Chicken – Hat Yai Style: A Comforting Delight You Must Try!
Picture this: a bustling market in Hat Yai, Thailand, where the tantalizing aroma of freshly fried chicken fills the air, making it impossible to resist! It was during one of my many travels to Thailand that I first discovered Thai Fried Chicken – Hat Yai Style. I remember savoring that crispy, golden exterior with my family, their laughter and the warmth of those shared moments blending beautifully with the vibrant flavors of the food. It quickly became our go-to dish, a source of comfort I still cherish today.
What makes this recipe stand out compared to others is how it captures the essence of Thai cuisine. The perfect combination of garlic, cilantro, and spices creates a marinade that infuses the chicken with a depth of flavor, while the frying process yields an irresistible crunch. Many fried chicken recipes fall short in flavor and complexity, but this one is bursting with authenticity and soul.
In this post, I’ll guide you through crafting your own Thai Fried Chicken – Hat Yai Style, so you can create heartwarming memories around the table too. Ready to dive into a culinary adventure? Let’s get cooking!
What are Thai Fried Chicken – Hat Yai Style?
Originating from the southern city of Hat Yai, this dish is a beloved street food staple that has captured the hearts (and appetites) of many. The magic lies in its unique marinating technique, where the chicken is tenderized and infused with a savory-sweet blend of fresh herbs and spices.
Each bite offers a delightful crunch from the rice flour coating, leading to succulent meat that is juicy and rich in flavor. The essence of Thai Fried Chicken – Hat Yai Style is the intricate balance of garlicky goodness and the fragrant hints of cilantro, making it not just a meal, but an experience.
This is a dish best enjoyed during gatherings, celebrations, or any occasion when you want to impress family and friends with a flavorful, comforting plate of fried chicken.
Why You’ll Love This Recipe
Here are several reasons why this Thai Fried Chicken – Hat Yai Style recipe will win hearts (and stomachs) in your home:
-
Irresistible Flavor: The marinade is a symphony of flavors, with garlic, cilantro, and a touch of sugar that promises a mouthwatering experience you’d never get from store-bought options.
-
Cost-Effective: Making this scrumptious fried chicken at home will save you money compared to dining out, plus you can whip up a large batch to feed a crowd!
-
Customizable: Adjust the flavors to suit your preferences. Want it spicier? Add some chili flakes to the marinade. Prefer a milder flavor? Simply reduce the seasoning.
-
Easily Mastered: Unlike some complex recipes, this one is relatively straightforward. Even if you’re a beginner, we’ll walk you through each step!
-
Love at First Bite: It’s perfect for family gatherings, casual dinners, or just satisfying those comfort food cravings. You’ll find yourself making it on repeat!
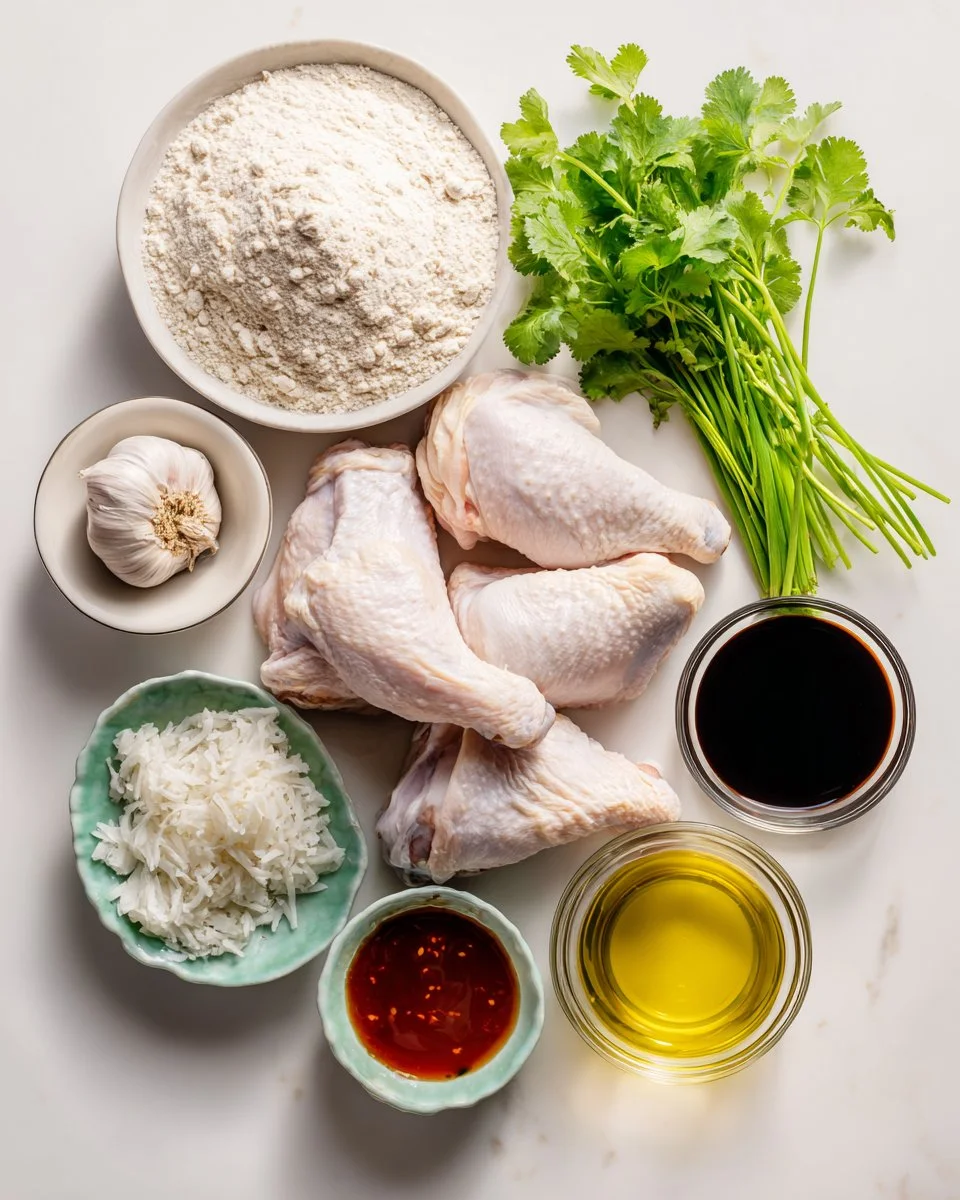
Ingredients Section
To create Thai Fried Chicken – Hat Yai Style, you’ll need the following ingredients:
-
1 1/2 lb bone-in, skin-on chicken (drumsticks, thighs, wings) – Look for fresh chicken from a reliable source for the best flavor. Organic options work beautifully too.
-
5 cloves garlic – Fresh garlic is a must; it adds that aromatic depth.
-
8 cilantro stems, chopped – Use more leaves if you’re a cilantro lover; it makes a refreshing crunch!
-
3/4 teaspoon white peppercorns or black – White pepper will give a subtle spice; black can offer a bolder kick.
-
2 1/2 teaspoon sugar – Regular granulated sugar is fine, but palm sugar will elevate the authenticity.
-
2 tablespoons Thai soy sauce (mushroom or regular) – Mushroom soy sauce is rich and adds a lovely umami flavor.
-
1 tablespoon fish sauce – A little goes a long way in bringing out savory notes.
-
1/2 cup water – This helps create the right marinade consistency.
-
1 cup rice flour – Essential for that crispy coating; don’t substitute this!
-
Oil for frying (canola, peanut, or any neutral oil) – The right oil is crucial; make sure it has a high smoke point.
-
Fried shallots (store-bought or homemade) – They add a delightful crunch and depth of flavor when served on top.
-
Sticky rice (for serving, optional) – Traditional accompaniment that complements the dish perfectly.
-
Sweet chili sauce (for dipping, optional) – A must-have condiment to bring everything together.
When prepping, remember to let the chicken sit at room temperature for about 30 minutes before marinating for even better flavor absorption.
Step-by-Step Instructions
Let’s get into the nitty-gritty of preparing this delicious dish. Follow these detailed steps for a spectacular result:
-
Prep the Chicken: Start by scoring the thickest part of the meat. This ensures the marinade penetrates deeply, making each bite bursting with flavor. If necessary, trim excess skin for even frying.
-
Marinade Magic: In a mortar and pestle, pound the white peppercorns until they form a fine paste. Add the garlic and cilantro stems, continuing to pound until well combined. Stir in the sugar, fish sauce, soy sauce, and water until mixed thoroughly. Marinate the chicken in this mix for at least 4 hours or, for the best results, overnight in the refrigerator.
-
Fried Shallots: Slice shallots thinly and season them with a pinch of salt. Let them sit for about 10 minutes to draw out moisture, then pat dry. Heat oil in a pan until hot and fry the shallots until golden brown and crispy, about 4-5 minutes. Remove and drain on paper towels.
-
Fry the Chicken: Heat oil in a wok or large pot to 375°F (190°C). Dredge your marinated chicken pieces in rice flour until thoroughly coated. Fry in batches at 300°F (150°C) until golden brown and cooked through, about 10-12 minutes per batch. Note: The chicken should reach an internal temperature of 175°F for dark meat and 155°F for breasts.
-
Cooldown & Serve: Allow the chicken to cool for 5-10 minutes on a cooling rack. This helps maintain its crispiness! Serve alongside sticky rice and sprinkle fried shallots on top for that added crunch.
Chef’s Tips: Monitor the oil temperature closely; too hot will burn the coating before the chicken cooks through.
Expert Tips & Tricks
Here are some of my pro tips to ensure your Thai Fried Chicken – Hat Yai Style turns out perfectly every time:
-
Marination is Key: Don’t rush this step. Allow the chicken to soak up the flavors overnight if possible.
-
Frying Respectfully: Ensure to maintain the oil temperature by using a thermometer, as this prevents greasy, soggy chicken.
-
Make-ahead Marvel: You can marinate the chicken a day in advance, giving you more time on the day of serving.
-
Storage Recommendations: Store leftover fried chicken in an airtight container in the fridge for up to 3 days. Reheat in an oven for that crispy texture again!
-
Troubleshooting: If your breading comes off while frying, ensure the chicken is adequately coated and the oil temperature isn’t fluctuating too much.
Serving Suggestions
Pair your Thai Fried Chicken – Hat Yai Style with a fragrant serving of sticky rice on the side to balance flavors. You can also serve a crisp Asian-style salad with a zesty lime vinaigrette to complement the richness of the chicken.
For presentation, sprinkle fresh cilantro leaves and a handful of fried shallots over your chicken—it not only looks fabulous but adds an inviting texture. Perfect for weeknight dinners, family gatherings, or sharing with friends during a cozy night in!
Variations & Substitutions
Feel free to get creative with this recipe! Here are some ideas to switch things up:
-
Flavor Enhancements: Add Thai basil or lemongrass to the marinade for a unique twist.
-
Dietary Needs: For a gluten-free option, substitute soy sauce with a gluten-free soy sauce alternative.
-
Seasonal Variations: Consider changing the texture with seasonal vegetables on the side, such as grilled asparagus or a fresh mango salad during summertime.
Nutrition & Storage Info
- Prep Time: 30 minutes (plus marination time)
- Cook Time: 20-30 minutes
- Total Time: 4+ hours (including marination)
- Yield: 4 servings
- Estimated Calories: Approximately 450 calories per serving, depending on serving size and oil absorption.
Storage Instructions:
- Room Temperature: Best enjoyed fresh.
- Fridge: Store wrapped in foil or in an airtight container for up to 3 days.
- Freezer: Freeze for up to 2 months; reheat in an oven to ensure crispiness.
FAQ Section
-
Can I use boneless chicken for this recipe?
Yes, boneless chicken will work, but may not be as juicy as bone-in options. -
What can I substitute for rice flour?
Cornstarch is often recommended, though it may not yield the same crunchy texture. -
How can I add spice to this dish?
Mix chili powder or fresh chopped chilies into the marinade for a spicier kick. -
Is this dish suitable for meal prep?
Absolutely! Just store the cooked chicken in an airtight container and reheat when ready. -
Can I bake the chicken instead of frying?
You can bake it at a high temperature after coating, but the frying method gives a unique crispiness. -
What type of oil is best for frying?
Oils with high smoke points, like canola or peanut oil, are great for frying. -
Is it necessary to use fish sauce?
While it’s a key ingredient for authentic flavor, you can substitute it with soy sauce. -
How long should I marinate the chicken?
At least 4 hours, but overnight is ideal for full flavor. -
Can leftovers be reheated?
Yes, reheat in the oven to maintain crispiness—in the microwave, they may get soggy. -
Does this dish freeze well?
Yes, but for best results, enjoy it fresh and reheat as needed.

Conclusion
Thai Fried Chicken – Hat Yai Style is more than just a dish; it’s an embodiment of rich flavors and warm family memories that can bring anyone joy. I encourage you to give this recipe a try, and I’m confident it will become a cherished addition to your cooking repertoire just like it has in mine. Have you made this dish before? I’d love to hear your stories or any variations you’ve tried. Don’t forget to explore other related recipes on the blog for more culinary adventures!

Thai Fried Chicken – Hat Yai Style
Ingredients
Method
- Start by scoring the thickest part of the meat. This ensures the marinade penetrates deeply, making each bite bursting with flavor.
- In a mortar and pestle, pound the white peppercorns until they form a fine paste. Add the garlic and cilantro stems, continuing to pound until well combined.
- Stir in the sugar, fish sauce, soy sauce, and water until mixed thoroughly.
- Marinate the chicken in this mix for at least 4 hours or, for the best results, overnight in the refrigerator.
- Slice shallots thinly and season them with a pinch of salt. Let them sit for about 10 minutes to draw out moisture, then pat dry.
- Heat oil in a pan until hot and fry the shallots until golden brown and crispy, about 4-5 minutes. Remove and drain on paper towels.
- Heat oil in a wok or large pot to 375°F (190°C).
- Dredge your marinated chicken pieces in rice flour until thoroughly coated.
- Fry in batches at 300°F (150°C) until golden brown and cooked through, about 10-12 minutes per batch.
- Allow the chicken to cool for 5-10 minutes on a cooling rack. This helps maintain its crispiness!